Can Beginners Print PP? Yes — as Long as You Choose the Right Filament
Yes, with the right filament. PPpro prints open-frame with no heated bed; a brim and PPLOCK26811 on the plate solve first-layer adhesion.
When first encountering PP 3D printing, many people hear a saying:
“PP is hard to print; beginners had better not touch it.”
For traditional PP filament, this impression is not without reason.
PP is a semi-crystalline polymer that is easily affected during FDM printing by shrinkage, warping, first-layer adhesion, and interlayer bonding. Therefore, compared with PLA and PETG, traditional PP often requires users to adjust print conditions more carefully.
But now, things are changing.
If you choose modified PP filament optimized for FDM printing, beginners can also start with PP.
Why is PPpro™ more suitable for beginners?
POLIVE PPpro™ is a modified PP filament developed for FDM 3D printing.
One of its development focuses is lowering several major barriers traditional PP faces during printing, including:
- Warping and shrinkage
- First-layer adhesion
- Interlayer bonding
- Sensitivity to the printing environment
PPpro™ can be tested on some open-frame FDM printers; an enclosure is not always required, and you can also useroom-temperature printing with the heated bed turned off.
But it should be noted that:
“Open-frame printing is possible” does not mean any printer or any model will succeed directly.
Printer condition, build-surface condition, model size, geometry, and ambient temperature all affect the final result.
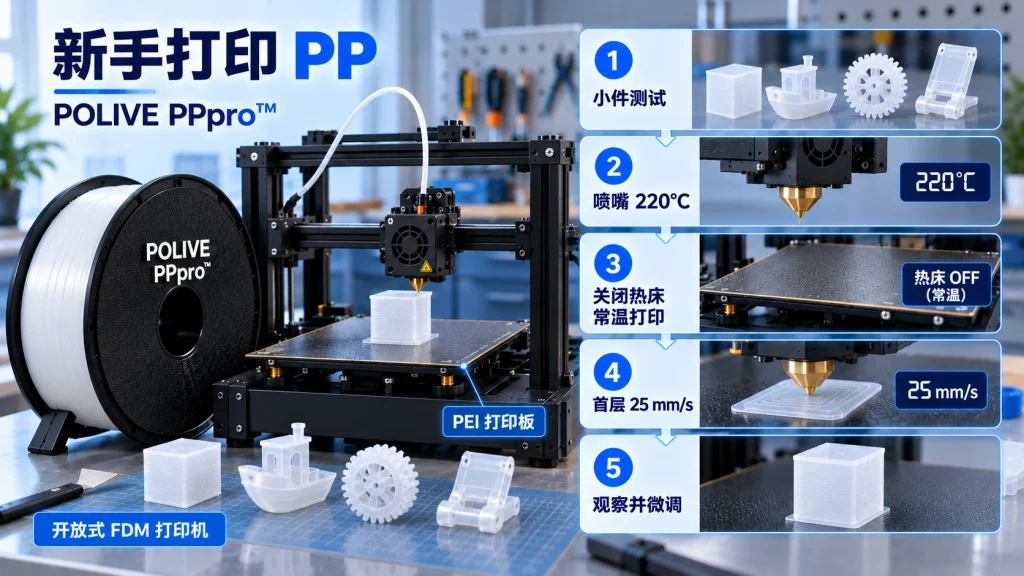
For a beginner’s first PPpro™ print, start with these 5 steps
1. Print a small test part first
Do not print a large model on the first attempt.
You can first print a simple small cube or other test part and observe:
- Whether the first layer is stable
- Whether corners lift
- Whether interlayer bonding is good
- Whether obvious deformation occurs during printing
Confirm the basic parameters before starting the actual model.
2. Start with a 220°C nozzle temperature
PPpro™ can be tested starting from the following nozzle temperatures:
Nozzle temperature: 220°C
Recommended test range:210–230°C
Different printers, nozzles, and models may need further adjustment, so do not treat 220°C as a fixed value for all equipment.
3. Turn off the heated bed and use room-temperature printing
When using PPpro™, you can start withheated bed off, room-temperature printingfor testing.
- Heated bed: OFF
- Build platform: room temperature
- Printing method: can start testing with open-frame printing
For room-temperature printing, the first-layer state, build-surface condition, and uniform cooling are especially important. We recommend first confirming the build plate is clean, adjusting the first-layer height, and testing in a stable indoor environment.
There is no need to solve warping by raising the bed temperature. If the first layer detaches or corners lift, first check first-layer adhesion, build-plate condition, model base area, and cooling.
4. Slow down the first-layer speed
For the first print, you can set the first-layer speed to:
25 mm/s
Recommended test range:20–30 mm/s
A slower first-layer speed gives the molten material more time to form stable contact with the build plate.
5. Fine-tune after the first print is done
Do not change many parameters at once.
First observe the print result, then adjust for the specific issue.
For example:
First layer won’t stick → Check build-plate cleanliness, first-layer height, and first-layer speed.
Corners lifting → Check first-layer adhesion, model base area, environmental stability, and whether cooling is uniform.
Insufficient interlayer bonding → You can try adjusting the nozzle temperature and print speed.
This makes it easier to find settings suited to your printer than blindly changing multiple parameters.
A set of starting parameters for PPpro™
For a first attempt, you can start with the following parameter set:
| Parameters | PPpro™ starting values |
|---|---|
| Nozzle temperature | 220°C |
| Heated bed | OFF |
| Build platform | Room temperature |
| First-layer speed | 25 mm/s |
| Normal print speed | 40–80 mm/s |
| Floor height | 0.16–0.20 mm |
| First-layer fan | Off |
| Subsequent fan | 50–80% (test starting point) |
| Retraction (direct drive) | 1–2 mm (test starting point) |
| Retraction (Bowden) | 3–5 mm (test starting point) |
These parameters should serve asstarting test values, not fixed answers for all printers and models.
In particular, retraction distance, fan, and print speed need adjustment based on the specific printer structure and model. Cooling settings should also be based on actual print results, with the focus on keeping cooling uniform.
Once you find parameters that suit you, PP is not as hard as imagined
PP’s difficulty mainly comes from the material’s own properties, not from FDM printers being unable to handle PP.
Once the material is optimized for FDM and the first layer, build platform, and cooling are properly controlled, PP can shift from a “hard-to-print material” to one an ordinary user can gradually master.
This is also the problem PPpro™ aims to solve:
not to make users learn more complex printing tricks, but to make the material itself better suited to FDM printing.
So beginners can certainly try PP.
The key is not “daring to print,” but:
Choose suitable PP filament → start with small models → print at room temperature with the bed off → adjust gradually based on results.
If you want to learn about PP filament storage and daily maintenance, you can refer to:How to store PP filament? Its low water absorption is one of its hidden advantages.
More PPpro™ product information and test samples:polive3d.com
新手能打 PP 吗?
能,前提是选对线材。普通 PP 对调机要求高,改性 PP 线材把收缩翘边、首层粘附、层间结合这三道坎先解掉了,第一次打也容易成功。
第一次打 PPpro™ 该怎么起步?
不加热床、不封箱,开放机架放在空调房里;平台薄涂 PPLOCK26811 等几分钟干透,加裙边;模型底部做圆角、增大接触面、壁厚均匀;先打小件验证再放大。
为什么不用先加封箱或换机器?
PP 冷却要散掉大量热,封箱反而把热困住,空调房开门开盖更快定型。我们在 Bambu A1 这类入门开放机器上打了很多模型,不需要额外硬件。
首层还是粘不住怎么办?
先检查胶水是否干透、平台是否干净(有油污用酒精擦)、首层高度和挤出是否正常,再加大裙边和底部接触面积。一次涂抹可多次打印,不用每次重涂。
Related Reading
- What Is PPpro? A Modified PP 3D Printing Filament That Needs No Heated Bed and Makes Living Hinges
- Does PP printing need an enclosure? Open-frame printing test with POLIVE PPpro™
- Does PP Printing Need a Heat Bed? Room-Temperature Printing and Cooling Setup
- How to Prevent PP Warping? How to Choose Between Brim, Raft, and Skirt
- How to Design PP Parts for 3D Printing? Wall Thickness, Fillets, Snap Fits and Warp Prevention
- What Print Bed Should Be Used for PP 3D Printing? A Comparison of Common Bed Materials