How to Prevent PP Warping? How to Choose Between Brim, Raft, and Skirt
Use a brim and PPLOCK26811, plus geometry: fillet sharp corners, add mouse ears, widen the bottom contact area and keep wall thickness even.
PP print warping usually relates to the balance between the stress caused by material cooling shrinkage and plate adhesion.
When choosing auxiliary structures, PP printing can usually prioritize Brim: it can expand the effective adhesion area between the part and the plate, while distributing some of the shrinkage stress, and it is relatively easy to remove after printing.
**Skirt** is mainly used to check the first layer and stabilize extrusion; it basically provides no warping prevention.Raft It can provide a larger adhesion base, but it increases material consumption and print time.
However, Brim is not the only way to solve all warping problems. Plate condition, first-layer settings, environmental conditions, the cooling fan, and model structure all need to be considered together.
For POLIVE PPproâ¢, you also need to combine the product’s actual printing positioning, focusing on plate adhesion, environmental stability, and cooling uniformityârather than simply relying on raising the heated-bed temperature to solve warping.
How Does Warping Happen?
PP shrinks as it cools after being melted and extruded.
If the cooling rates of different regions differ significantly, shrinkage stress can build up. When the shrinkage acting on the part’s edges exceeds its adhesion to the build plate, the corners may gradually lift away from the plate and warp upward.
Therefore, PP warping can usually be improved from two directions:
Reduce the shrinkage stress caused by uneven cooling + increase plate adhesion.
Reducing shrinkage stress can start from material properties, print speed, environmental conditions, and cooling uniformity; increasing adhesion can be achieved through plate material, first-layer settings, and auxiliary structures such as Brim and Raft.
Brim and Raft are essentially methods that increase the effective adhesion area and improve adhesion conditions.
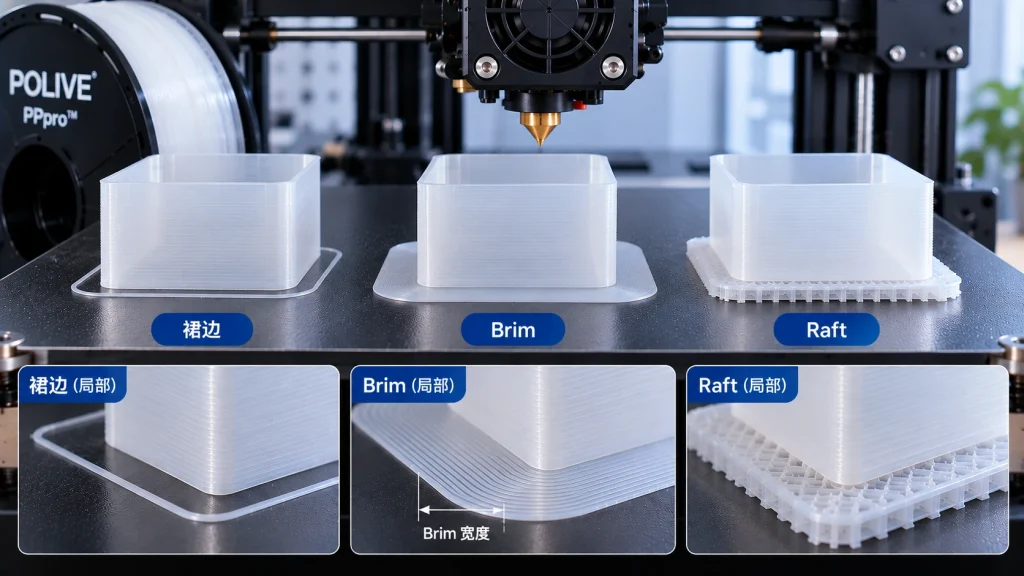
How to Choose Between Skirt, Brim, and Raft?
The three structures look similar, but their actual functions differ.
Skirt
A skirt is one or more loops of lines printed around the part’s perimeter, but it is not connected to the part itself.
Its main role is not to increase the part’s adhesion area, but to help the printer before formally printing the part:
- Stabilize extrusion
- Check whether the nozzle is extruding normally
- Observe the first-layer height and flow
- Detect bed-leveling issues early
Therefore, a skirt provides very limited direct help in preventing PP warping.
If your goal is to prevent warping rather than to check the first layer, then you should prioritize Brim.
Brim
A brim is a thin edge extending outward around the bottom perimeter of the part, and it is connected to the part.
It can expand the effective contact area between the part and the plate, distributing the shrinkage effect over a larger area, thereby reducing the likelihood of edges lifting off the plate.
For PP printing, Brim is usually the most practical first choice.
Its advantages include:
- Increased adhesion area
- Targeted at corner lifting
- Less material increase compared to Raft
- Relatively limited increase in print time
- Relatively easy to remove after printing
How to Set the Brim Width?
You can start testing with a smaller width, then adjust based on the model size and the degree of warping.
For example, you can use the following values as a starting point for testing:
- Small parts: 3â5 mm
- Medium parts: 5â8 mm
- Large-area parts: increase further based on the actual warping situation
These values are more suitable as a starting point for parameter testing, rather than fixed standards that apply to all models.
For large parts, if simply increasing the Brim width still cannot solve warping, you should go back and check plate adhesion, environmental conditions, cooling uniformity, and model structure, rather than increasing the Brim indefinitely.
Raft
A raft is an independent base layer printed first beneath the part, on which the part is then built.
Compared with Brim, a raft can provide a more complete bottom base, so it may be more helpful when the plate condition is poor or the model is particularly difficult to print.
Its advantages include:
- Provides a larger bottom adhesion base
- Can somewhat reduce the direct impact of plate surface condition on the model’s bottom
- More useful for models with complex bottom shapes or poor plate conditions
But it also has obvious costs:
- Increased material consumption
- Increased print time
- More complex post-processing
- The bottom of the part may be less flat than printing directly on the plate
Therefore, Raft is more suitable for difficult printing scenarios where Brim still cannot solve the problem, rather than as the default setting for all PP printing.
What Are the Differences Between Brim, Raft, and Skirt?
| Auxiliary structure | Increases adhesion area? | Main function | PP warping prevention effect | Material and time |
|---|---|---|---|---|
| Skirt | No | Check extrusion, first layer | Very limited | Less increase |
| Brim | Yes | Increases edge adhesion | Usually practical | Less increase |
| Raft | Yes | Provides bottom base | May help more in some difficult scenarios | More increase |
Simply put:
Skirt is for checking, Brim is for strengthening adhesion, and Raft is for handling more difficult situations.
Not Enough with Brim Alone? Check These Factors
If you have already increased the Brim but PP still warps noticeably, do not keep simply increasing the Brim width.
You can troubleshoot in the following order.
1. Check the build plate
First, confirm that the plate is clean and that the plate material used is suitable for PP.
You can consider options such as PP film or PP board, and check whether the first layer forms a stable, continuous contact.
A relatively intuitive way to judge is to observe the first layer:
The first-layer lines should have a certain degree of compaction, while remaining clear and continuousânot obviously floating or over-extruded.
If there is oil, dust, or residue on the plate surface, it may also affect adhesion performance.
2. Check the environment and cooling
During PP printing, both environmental conditions and whether cooling is uniform affect the part’s shrinkage and warping.
For POLIVE PPproâ¢, it is recommended toprint in a relatively stable indoor environment such as an air-conditioned room, and focus on whether the cooling of each region of the print is uniform.
You can check:
- Whether the printing environment has obvious temperature fluctuations
- Whether the cooling rates of different regions of the print differ significantly
- Whether the edges of large parts are more prone to lifting
- Whether local deformation occurs at thin walls, sharp corners, or long edges
If the cooling differences between regions are obvious, adjustments can be made in combination with the model structure and print settings.
The key is not to blindly raise the surrounding temperature, but to minimize the shrinkage stress caused by uneven cooling.
3. Check the cooling fan settings
The cooling fan affects the material’s heat dissipation rate.
If cooling is too fast at the beginning of printing, it may affect first-layer stability and subsequent interlayer bonding. Therefore, based on actual print performance, you can appropriately adjust the fan-on time or fan speed for the first few layers, then observe the first layer and corner conditions.
However, fan settings should not be judged in isolation from the specific material and print parameters. When adjusting, change only one major variable at a time to make results easier to compare.
4. Adjust the first-layer print settings
The first layer is the foundation for the entire part to establish adhesion with the plate.
You can conduct small-scale tests on the following parameters based on the actual situation of the equipment and material:
- First-layer speed
- First-layer line width
- First-layer height
- First-layer extrusion amount
If the first-layer gap is too large, the filament may not spread sufficiently; if there is too much extrusion, it may also cause an uneven first layer or edge buildup.
It is recommended to first confirm whether the first layer is uniform and continuous, then decide whether further extrusion adjustments are needed.
Model design also affects warping
Some warping problems are not entirely caused by print parameters; the model’s own structure can also amplify shrinkage stress.
Sharp right angles
Sharp outer corners easily become locations where shrinkage stress concentrates.
If the design allows, you can use appropriate fillets instead of very sharp right angles to reduce the deformation risk from local stress concentration.
Large flat bottom
Large-area parts may accumulate noticeable shrinkage stress during cooling.
Therefore, besides using Brim, you also need to pay special attention to plate adhesion, environmental stability, and whether overall cooling is uniform.
Enclosed frame structure
For some frame-type parts, shrinkage stress may concentrate in the middle region of longer edges.
For such models, besides adjusting print parameters, you can also start from the model orientation and structural design, and add process connection structures when necessary to reduce the risk of local deformation.
How Should You Combine Warping-Prevention Measures?
If you are just starting to print PP, you can use a relatively simple troubleshooting sequence.
Step 1: Check the plate
Clean the plate and confirm that the first layer can adhere stably.
↓
Step 2: Check the first layer
Confirm that the first-layer height, line spreading, and extrusion state are reasonable.
↓
Step 3: Focus on environment and cooling
Print in a relatively stable air-conditioned room, and focus on whether cooling is uniform.
↓
Step 4: Use Brim
If corners still lift, prioritize increasing the Brim rather than using Raft directly.
↓
Step 5: Adjust cooling and first-layer parameters
Adjust the fan settings, first-layer speed, and extrusion settings for the first few layers based on actual performance.
↓
Step 6: Check the model structure
If it is a large, sharp-cornered, or complex structure, then optimize from the model design and orientation.
This approach makes it easier to find the factors that truly affect warping than changing multiple parameters at once from the start.
Summary
PP warping is essentially related to the balance between shrinkage stress and plate adhesion. Preventing warping usually requires troubleshooting from two directions: reducing the shrinkage stress caused by uneven cooling, and increasing plate adhesion.
- **Skirt** is mainly used to check extrusion and first-layer status; it itself adds almost no adhesion.
- Brim It can expand the adhesion area and is the most practical preferred auxiliary structure in PP printing.
- Raft It provides a more complete bottom base and is more suitable for difficult models with poor plate conditions or where Brim still cannot solve the problem.
- Plate cleanliness and first-layer condition are the foundation; Brim can only serve as further assistance.
- Large parts should pay special attention to environmental stability, cooling uniformity, and plate adhesion, rather than simply increasing the Brim width.
- If warping persists after using Brim, you should continue to check the plate, environment, cooling fan, first-layer parameters, and model structure.
For POLIVE PPproâ¢, it is recommended to print in a relatively stable air-conditioned room and verify with a suitable plate, Brim settings, and uniform coolingârather than relying on a single warping-prevention measure.
PP 翘边到底是怎么发生的?
材料冷却收缩产生内应力,当应力大于首层对平台的附着力,边角就被拉起来。所以要么减小应力,要么提高附着,两头都能下手。
Skirt、Brim、Raft 该怎么选?
Skirt 只是排料不参与附着,Raft 费料费时、底面差;我们的常规做法是 Brim 裙边配合专用胶水——PPLOCK26811 薄涂平台等干透,一次涂抹可多次打印,清洁用酒精擦。
光加裙边还不够,再查什么?
查平台是否干净、胶水是否干透、首层高度与挤出、环境有没有穿堂风或局部热源、冷却是否均匀。这些比反复加宽裙边更有效。
模型设计能解决多少翘边?
能解决一大半。直角改圆角、底部加厚做老鼠耳朵、增大底部接触面积、壁厚尽量均匀,都是从源头减小收缩应力;我们在 Bambu A1 上打大底件靠的主要是这套设计手段,不是加热床和封箱。
Related Reading
- What Print Bed Should Be Used for PP 3D Printing? A Comparison of Common Bed Materials
- 为什么 PP 以前这么难打?收缩、翘边、粘不住的三大难题
- How to Configure PP 3D Printing Settings? PPpro™ Parameter Guide
- What Is PP’s Melting Point? How Should PP Printing Temperature Be Understood