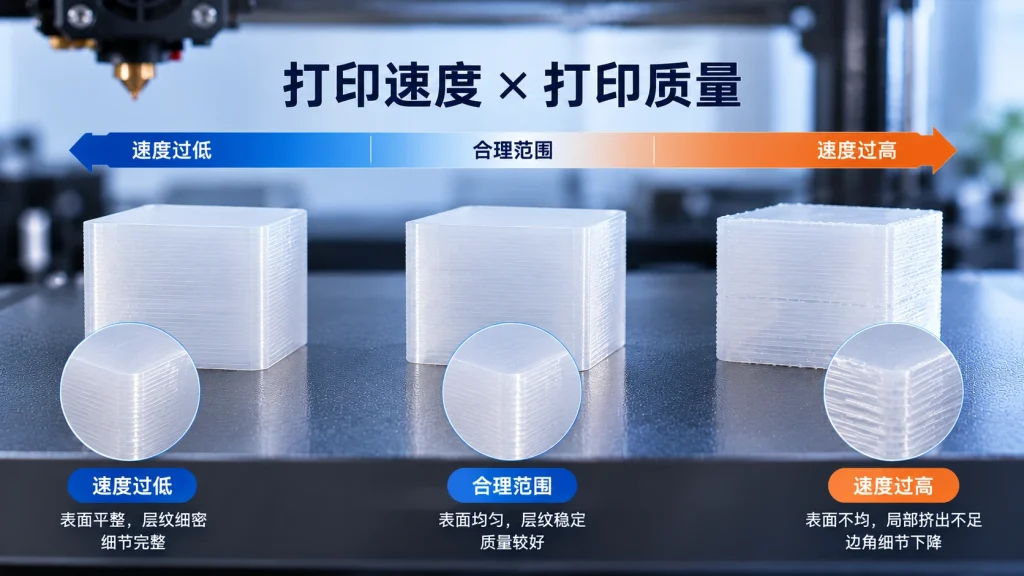
What Print Speed Should Be Set for PP? The Impact of Speed on Print Quality
Moderate steady speeds work best: PP needs time to shed heat as it cools, so consistent open-frame prints give cleaner layers than high flow.
What print speed should be set for PP?
For PP print speed, you can first start from 40–60 mm/s and verify around that range, then gradually adjust based on the print results. Usually you can appropriately reduce the outer-wall and first-layer speed to give the material more time to complete extrusion and adhesion.
However, speed itself is not the ultimate goal.
What truly determines print quality iswhether the nozzle temperature, material flow, print speed, and cooling conditions are matched.
Therefore, for PP printing, the following approach is recommended:
Stabilize first, then increase speed.
First find a stable temperature and extrusion state, then gradually increase the speed. This is usually easier to tune than pursuing the highest speed from the start.
What Does Print Speed Affect?
When the print speed increases, the time the nozzle stays at a certain position shortens, and at the same time the amount of material that needs to be extruded per unit time also increases.
This brings a series of changes.
Interlayer bonding
After molten material is deposited, it needs to form a bond with the next layer of material while still retaining some heat.
If the print speed is too fast and the hot end cannot supply enough molten material in time, or if the material cools too quickly, interlayer bonding may be affected.
This is especially worth noting for PP parts that require higher structural strength.
Surface quality
If, after increasing the speed, the hot end and extrusion system cannot supply enough material, under-extrusion may occur.
Common signs include:
- Irregular streaks appear on the surface;
- Local gaps appear;
- Lines become thinner at corners;
- Walls become discontinuous;
- Stringing increases.
Therefore, when you see these phenomena, you should not simply conclude “the speed is too fast”; you also need to check the nozzle temperature and actual flow at the same time.
First-layer adhesion and warping
When the first-layer print speed is too fast, the time for the material to spread and compact on the build plate decreases.
If the first-layer adhesion itself is unstable, further increasing the speed may raise the risk of edge lifting.
Therefore, PP printing can usually keep the first layer at a relatively low speed.
Flow load on the hot end and extrusion system
The higher the print speed, the more material needs to be melted and extruded per unit time.
Simply put, the actual extrusion demand is related to:
print speed à layer height à line width
.
If the required flow exceeds the hot end’s melting capacity, under-extrusion may occur.
Therefore, the maximum speed for PP printing is often limited bythe hot end’s melting capacity and the actual flow capability, not just by the printer’s motion system.
How to Set PP Print Speed?
Under our test conditions,PPpro⢠can use the following parameters as a starting point for small-range verification:
| Item | Reference starting point |
| Outer wall | 30–40 mm/s |
| Inner wall / infill | 40–60 mm/s |
| First layer | 20–30 mm/s |
| Total flow at a 0.2 mm layer height | Determined by the nozzle diameter and hot-end capability |
These values are more suitable asa testing starting point, rather than fixed standards that apply to all printers and models.
Different printers have different hot ends, extruders, nozzle diameters, and model structures, so the final speed needs to be verified through actual print results.
What Should Be Adjusted First When Tuning PP Parameters?
When printing PP, it is recommended to proceed in a relatively simple order:
First determine the temperature â then adjust the speed â finally optimize cooling.
Step 1: Determine the nozzle temperature
First ensure that the material can melt stably and extrude normally.
If the temperature itself is insufficient, directly increasing the print speed can easily push the hot end into a flow bottleneck, causing under-extrusion.
Step 2: Adjust the print speed
After the temperature is stable, gradually increase the print speed.
If surface streaks, thinning at corners, or discontinuous extrusion begin to appear after increasing the speed, you can first lower the speed for comparison.
Step 3: Adjust the cooling fan
Finally, adjust the cooling based on the part size, print speed, and surface performance.
Especially for the first layer and the first few layers, avoid cooling too quickly and affecting build-plate adhesion.
Why Is Acceleration Also Important?
The “print speed” in the slicer software does not mean the print head will always maintain this speed throughout the entire printing process.
Actual motion is also affected by:
- Acceleration;
- Corner speed;
- Print path length;
- Machine motion capability;
- Vibration control;
- Minimum layer time
and other factors.
For example, if a high print speed is set while the acceleration is also high, the print head needs to change its motion state rapidly near corners, which may cause the extrusion system’s response to lag behind the motion changes.
Therefore, for small and medium-sized printers, you can first use relatively conservative acceleration settings to make the actual motion more stable.
When Can You Try to Increase Speed?
If the following conditions appear, you can consider gradually increasing the print speed:
- The print surface is relatively flat;
- Interlayer bonding is stable;
- Lines at corners show no obvious thinning;
- Extrusion is continuous;
- Flow test results are stable;
- Hot-end temperature variation is small;
- First-layer and edge adhesion are normal.
Suggestions when increasing speed:Change only one variable at a time.
For example, first increase from 40 mm/s to 45 mm/s, observe the result, then decide whether to continue increasing, rather than jumping directly from 40 mm/s to 80 mm/s at once.
When Do You Need to Reduce Speed?
If the following conditions appear, you can prioritize trying to reduce the print speed:
- Obvious streaks appear on the surface;
- Local pits or gaps appear;
- Obvious thinning at corners;
- Under-extrusion appears on the walls;
- Layers are easily pulled apart;
- The extruder shows obvious skipped-step or “clicking” sounds.
At this point, you can first lower the speed and then observe whether the problem disappears.
If it still persists, further check the nozzle temperature, flow, and extrusion system.
Why Can’t Small Parts Be Sped Up Indiscriminately?
Small-sized parts have another special issue:
Minimum layer time.
If the model is very small, even if the print speed is set very high, the actual printing time for a single layer may still be very short.
At this point, if the previous layer has not cooled sufficiently and the next layer begins printing, the local temperature may continue to rise, leading to:
- Small pillars deform;
- Sharp corners soften;
- Details become unclear;
- Part dimensions change.
Therefore, small parts sometimes do not need a higher speed, but rather need toMinimum layer timegive each layer enough cooling time.
Is the Speed Shown by the Slicer Software the Actual Speed?
Not necessarily.
The slicer software shows the target speed, but during actual printing, the printer is also affected by acceleration, corner deceleration, minimum layer time, and motion-control strategies.
Therefore, even if the slicer software shows:
60 mm/s
the print head will not necessarily maintain 60 mm/s throughout the entire path.
Therefore, when evaluating whether the PP print speed is appropriate,the actual performance of the final printed part is more meaningful than simply staring at the speed number in the slicer software.
What Should You Pay Attention to When Increasing PP Print Speed?
You can adopt a relatively simple method:
Step 1
Use relatively conservative speeds, for example:
Outer wall 30â40 mm/s
Inner wall / infill 40â60 mm/s
First layer 20â30 mm/s
Step 2
Confirm:
- First layer is stable;
- Surface is normal;
- No obvious under-extrusion;
- Interlayer bonding is normal.
Step 3
Increase only one speed parameter at a time, for example by adding 5–10 mm/s.
Step 4
Observe the print results.
If the quality remains stable, you can continue to increase the speed slightly.
If under-extrusion or surface-quality degradation begins to appear, return to the previous stable speed.
This method makes it easier to determine the actual processing window of the printer and material than drastically increasing the speed all at once.
Summary
PP print speed should not be as fast as possible, but needs to be matched withnozzle temperature, flow, hot-end capability, and cooling conditions.
You can remember the following points:
- PPpro⢠can use an outer-wall speed of 30â40 mm/s, inner-wall/infill of 40â60 mm/s, and first layer of 20â30 mm/s as a testing starting point.
- The higher the speed, the more material needs to be melted and extruded per unit time.
- The hot end’s melting capability is an important factor limiting high-speed printing.
- Appropriately reducing the first-layer speed helps stabilize first-layer adhesion.
- Surface streaks, thinning at corners, layers that separate easily, and extruder skipped steps can all serve as signals that you need to reduce the speed or further check the parameters.
- Acceleration and minimum layer time also affect the final print results.
- When tuning parameters, it is recommended toChange only one variable at a time.
- The most reasonable order is usually:Stabilize the temperature first, then adjust the speed, and finally optimize cooling.
For POLIVE PPpro™, it is recommended to start with conservative speed settings, and after confirming that the temperature, flow, and interlayer bonding are stable, gradually increase the speed based on the printer’s hot-end capability and actual needs.
PP 的打印速度该怎么定?
没有通用数字,建议以你手上这款线材的出厂建议为起点,先打小件验证层间结合和表面,再逐步调整。切片软件显示的速度也不等于实际速度,还受加速度和拐角限速影响。
速度主要影响 PP 的哪几件事?
层间结合、表面质量、首层附着与翘边,以及热端和挤出系统的流量负荷。速度提高时,最容易先牺牲的是层间结合和首层稳定。
什么时候该降速?
小尺寸件、薄壁件、大底板首层、出现层纹发虚或边角翘起时。PP 需要均匀冷却,太快容易让局部还软就继续堆料,收缩应力反而更大。
调 PP 参数先动哪一项?
先确定喷嘴温度让熔体状态稳定,再调速度,最后看加速度和风扇。环境上保持空调房开放散热、避开穿堂风,比反复微调速度数字更管用。
Related Reading
- What Nozzle Should Be Used for PP Printing? Nozzle Wear and Material Selection
- What to Do When PP Printing Jams? Troubleshooting Steps for Poor Extrusion
- How Strong Are the Interlayer Bonds of PP Prints? How to Improve Z-Direction Strength
- How Good Is the Surface Quality of PP Prints?
- Are PP Prints Dimensionally Accurate? Shrinkage Compensation and Tolerance Control
- How to Design PP Parts for 3D Printing? Wall Thickness, Fillets, Snap Fits and Warp Prevention