No Support, Single-layer Printing: How the PPpro Vase Stays Warp-Free Under Backlight
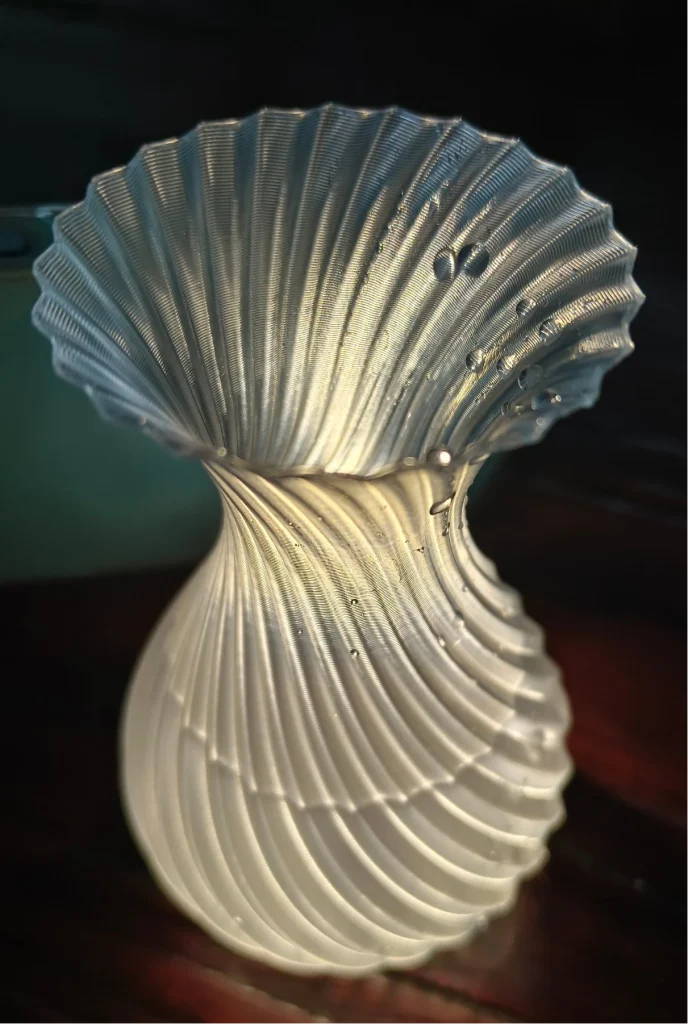
Caption: A backlit photo of a single-wall vase printed with POLIVE PPpro. Printed with a 0.4 mm nozzle, ~0.6 mm wall thickness, fully support-free and glue-free at room temperature (no heated bed). After printing, boiling water was poured in directly for a leak test.
1. Backlighting: The Most Unforgiving Test
To see the true quality of an FDM print, backlighting is the most direct test.
Anyone familiar with porcelain knows a rule: viewed from the front, the glaze usually looks flawless; but held to strong light at an angle, bubbles, glaze shrinkage and seams appear. Light is the most objective testing mediumâany microscopic surface defect is exposed under backlight.
3D prints are the same. A part that looks smooth under frontal white light will, under backlight, have every layer-to-layer undulation amplified into light-and-dark bands. Defects such as sinking, warping and incomplete interlayer fusion are all revealed directly.
Therefore, this vase was deliberately shot under backlightâmainly for rigorous, objective verification rather than for visual effect.
2. What You Can See in the Light
Observing the vase from bottom to top, you can confirm three characteristics:
First,even layer spacing. As light passes through the wall, the light-and-dark bands are arranged at equal intervals like ripples, with no widening or narrowing from top to bottom. This shows stable extrusion and consistent actual line width per layer, with no under- or over-extrusion.
Second,continuous layer transition along the curved surface. The vase’s waist contracts and expands with continuously changing curvature. In such a shape, any loose interlayer bonding would break the light band or show skewed dark streaks. In the photo, the body has no breakpoints; the bands stay continuous along the spiral texture all the way to the rim.
Third,no shadow dead zones. Sinking and deformation are most easily exposed under backlightâwhere the wall sinks, its thickness increases and light cannot pass through, forming a dark zone; where it lifts, the wall thins or gaps open, leaking bright lines. Neither case appears on this vase.
In short, surface smoothness is judged not only by touch but must be verified under light. Every curved surface and every line of this vase appears continuous, smooth and unbroken in the light.
3. Why Thin-Wall PP Printing Is Hard
Based on the FDM forming principle: a model is built by stacking layers. Overhangs beyond 45° usually need supports; otherwise the lower layers lack support and easily sink.
From base to rim, this vase has a continuously curving side wall, with the thinnest part a single 0.6 mm shell. The thinner the wall, the smaller the tolerance for errorâslightly weak interlayer bonding lets the lower layers sink and deform the whole; uneven cooling and material stress warp the curved surface; and extrusion fluctuations show up as dark bands under backlight.
4. Why PP Can Do It
PP is a semi-crystalline material. When molten, its molecular chains entangle; when cooling, crystalline regions form physical anchors that weld adjacent layers. This bonding exceeds PLA’s glassy-core adhesion and is comparable to PETG’s molecular entanglement.
On parameters, we used a 0.4 mm nozzle with a fine layer height, keeping the single-layer line width around 0.6 mm so each layer’s cross-section is close to rectangular rather than roundâincreasing the contact area between layers and improving fusion. Nozzle 210°C, fan 20%, speed 20 mm/s. The temperature is high enough for thorough interlayer melting; the fan is sufficient for fast, even crystallization; and the stable speed keeps extrusion continuous. Only together do they achieve the effect above.
Special note: These parameters are for POLIVE PPpro. Different PP formulations vary in MFR (melt flow rate), molecular weight distribution and nucleating agents, so the parameters cannot be copied directly. To precisely control this print window, we tested and optimized repeatedly for three months
5. A 0.6 mm Single Wall That Holds Boiling Water Without Leaking
Boiling water was poured into the vase with no leakage. The core reason is the continuity between layers.
PP’s melting point is 160â170°C; boiling water at 100°C is far below its softening point, so short-term holding of boiling water is structurally stable. PLA’s Tg (glass transition temperature) is only 60°C, so it softens with boiling water; PETG meets the temperature requirement but is denser than PP, gaining over 30% more weight per equal volume, and is likewise unsuited to repeated single-wall pressing.
The core of sealing performance is no interlayer delamination and no break in extrusion. A 0.6 mm single wall that does not leak proves true fusion between layers rather than mere physical stacking. This can be verified by the fingernail cross-section test: a fully fused section is continuous, while an incompletely fused one delaminates and flakes.
Red-line note: Holding boiling water without leaking is a measured result for this particular vase and does not mean all PP prints can hold boiling water. We also do not recommend long-term use of 3D-printed parts for hot water or food. Food-contact certification is still in progress.
6. Parameter Starting Points
| Parameters | Setting | Instructions |
| Nozzle | 0.4mm | Single-layer line width pressed to ~0.6 mm |
| Nozzle temperature | 210°C | PPpro temperature range, interlayer fully fused |
| Bed temperature | Cold plate printing | No heated bed, open-cover printing |
| Fan | 0–20% | Fast cooling, even crystallization |
| Floor height | 0.2mm | Fine layer height, flatter under backlight |
| Wall thickness | 0.6 mm (single-wall shell) | Thin wall holds up, verifies bonding strength |
| Speed | 20–40mm/s | Stable extrusion, continuous line |
| Supports | None | Spiral curved surface self-supporting |
Different machines differ in hot end, fan and extrusion force, so parameters need fine-tuning:
Interlayer delamination: raise temperature by 5°C
Hazy surface or stringing: lower temperature by 5°C
7.Conclusion
PP’s advantage is not a single leading parameter, but achieving light weight, translucency, heat resistance and excellent interlayer bonding all at onceâwithout a heated bed or enclosure. The combination of multiple properties is what sets PPpro apart from other materials.
If you have printed an interesting part with PPpro, feel free to send us a backlit photo. If you have any printing questions, we welcome you to reach out anytime.
This article is based on POLIVE’s internal measurements. Parameters: 0.4 mm nozzle, 210°C nozzle, room-temperature bed, 20% fan, 0.2 mm layer height, ~0.6 mm single-wall shell.
Read Next:
· Can 3D Printed Parts Touch Food? Key Considerations for PP in Food Contact Applications
· How Good Is the Surface Quality of PP Prints? A Semi-Matte Texture Test
· Does PP Printing Need an Enclosure? Open-Frame Printing Test with PPpro™
·
Why Can a Support-Free, Single-Wall Vase Stay Flat and Shrink-Free?
Backlighting is the least forgiving test: thin walls, a single layer, no supports — any shrinkage or distortion shows up under the light. What keeps it stable is controlled material shrinkage and a uniform, continuous wall path, not a heated bed or an enclosure holding it down.
What Does Backlighting Reveal?
Whether the wall thickness is even, whether material has built up locally, whether layers are continuous, and whether there is slight ovalisation. None of this shows in an ordinary photo, but it all becomes visible the moment light passes through.
What Do Thin-Walled Parts Like This Demand from the Printing Conditions?
Even heat dissipation, a continuous path and no local heat build-up. Our approach is no heated bed and no enclosure: open heat dissipation in an air-conditioned room lets PP carry the heat away promptly as it cools.
How Should the First Layer Be Handled for Parts Like This?
With a small bottom contact area, adhesion has to be solid: coat the plate thinly with PPLOCK26811 and let it dry, add a brim, and give the model rounded corners with a slightly larger contact area, plus mouse ears if needed.
Related Reading
- How to Design PP Parts for 3D Printing? Wall Thickness, Fillets, Snap Fits and Warp Prevention
- How to Prevent PP Warping? How to Choose Between Brim, Raft, and Skirt
- How Good Is the Surface Quality of PP Prints?
- How to Judge the Quality of Modified PP Filament? Which Tests to Check When Buying
- What Is PPpro? A Modified PP 3D Printing Filament That Needs No Heated Bed and Makes Living Hinges
- Does PP printing need an enclosure? Open-frame printing test with POLIVE PPpro™